DietPi Installation
Posted on March 30, 2023
Introduction
In this tutorial I’ll be showing how to install the DietPi operating system which is an alternative to the standard Raspberry Pi OS. They’re both based on Debian and are extremely similar to each other, but there are a few differences that make DietPi a slightly better choice.
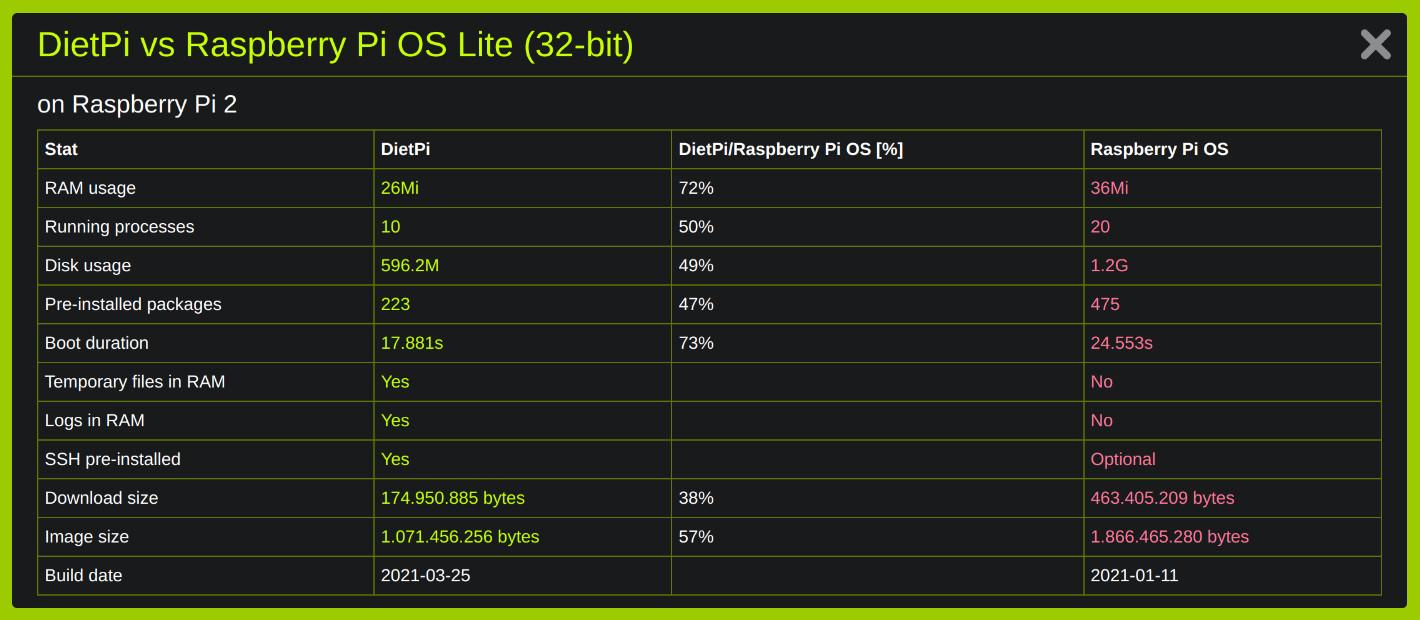
As its name suggets, DietPi is lighter and uses less memory which can make a difference in certain applications, especially in older Pi models that have less than 1GB of RAM. DietPi also minimizes unnecessary writes to the SD card, meaning your SD card won’t degrade as fast compared to the standard Raspberry Pi OS. Another key difference is the interactive menus which makes installing packages much easier for people who are new to Linux. Both operating systems are based on Debian and can run the exact same packages, so you won’t be missing out on anything with DietPi.
Download DietPi & Flash to SD card
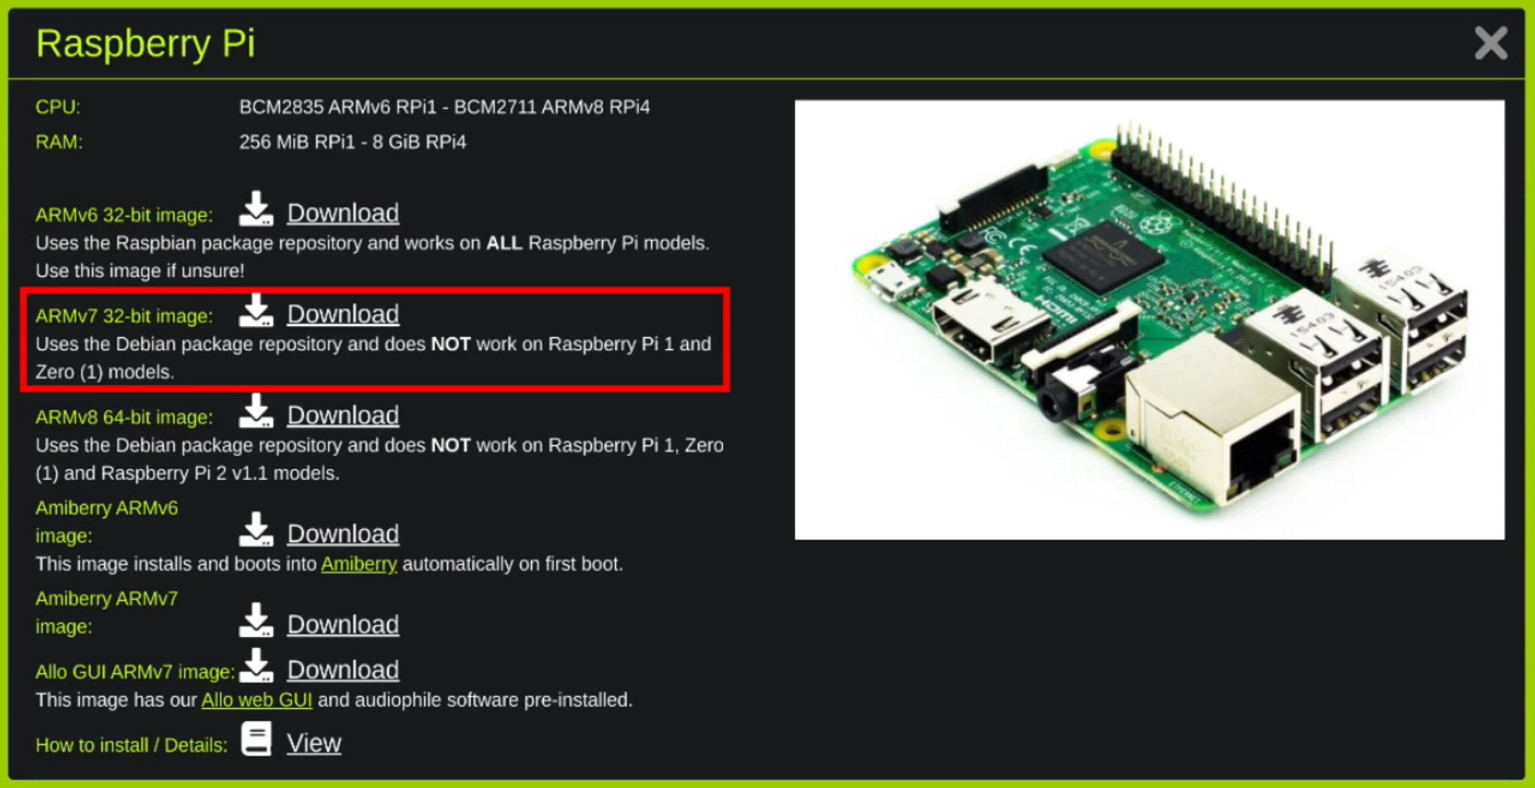
First go to DietPi’s official download page. Once there, you’ll see it supports many different embedded systems. Click on Raspberry Pi. Now you’ll be given a few different options to download. If you’re running the original Pi then you’ll want to select the ARMv6 image. This also includes the Raspberry Pi Zero. For all other models, you’ll want to select the ARMv7 image. The only exception is if you have an 8GB Raspberry Pi 4, in that case you can download the ARMv8 64 bit version to get access to all 8GB of RAM.
Once it’s downloaded, use a flashing tool such as Etcher to write the image onto an SD card. You can safely get away with a minimum of 8GB for the card, but with how cheap flash memory is now, I’d recommend getting 32GB minimum with at least an A1 speed rating if you’re looking to buy one.
When it’s done flashing go ahead and insert the card in the Pi and turn it on. I’ll be using SSH to acess the Pi over my network from another computer. This method is the most convenient once you get it set up, but keep in mind you can also connect a monitor, mouse, and keyboard to the Pi and access it directly if you’re not able to use a network cable.
Find the Pi's IP Address
The first thing we need to do before we connect to it is find out its local IP address. There are multiple ways to do this but I think the easiest way is to login to your router and go to the LAN settings to see a list of all your connected devices and their addresses. But each router has a different menu, so the exact location of this list will vary between model. An alternative way to check is by using this software called Angry IP scanner which is available for Windows, Mac, and Linux.

d
After installing and running Angry IP scanner, click the start button and it will begin scanning your network. Wait until it’s done scanning then sort the results by clicking the hostname column at the top. Your connected devices will show up with a blue circle next to them, so we know the Pi is one of these. Most devices will have a hostname to easily identify it. In this case my Pi doesn’t have a hostname but I know it’s the one highlighted in the picture. Yours might not have a hostname either, so you might need to try a few IPs before finding the correct one. However my Pi had a hostname when I checked in my router's settings, so that's why I recommend checking your router settings first and only use Angry IP scanner as a last resort.
Login via SSH
Now lets try logging into the PI. If you’re on a Mac or Linux then you can use SSH to login. The default username to login is root. Open the terminal and type ssh root@IPaddress, where IPaddress is the IP of your Pi. If you’re using Windows then you can use a program called Putty to login.
Keep in mind DietPi has a second user account with which you can use to login. The username for that account is dietpi and the password is also dietpi. However for the initial setup, you must login with the root user first. The default password for the root user is dietpi.
First Boot
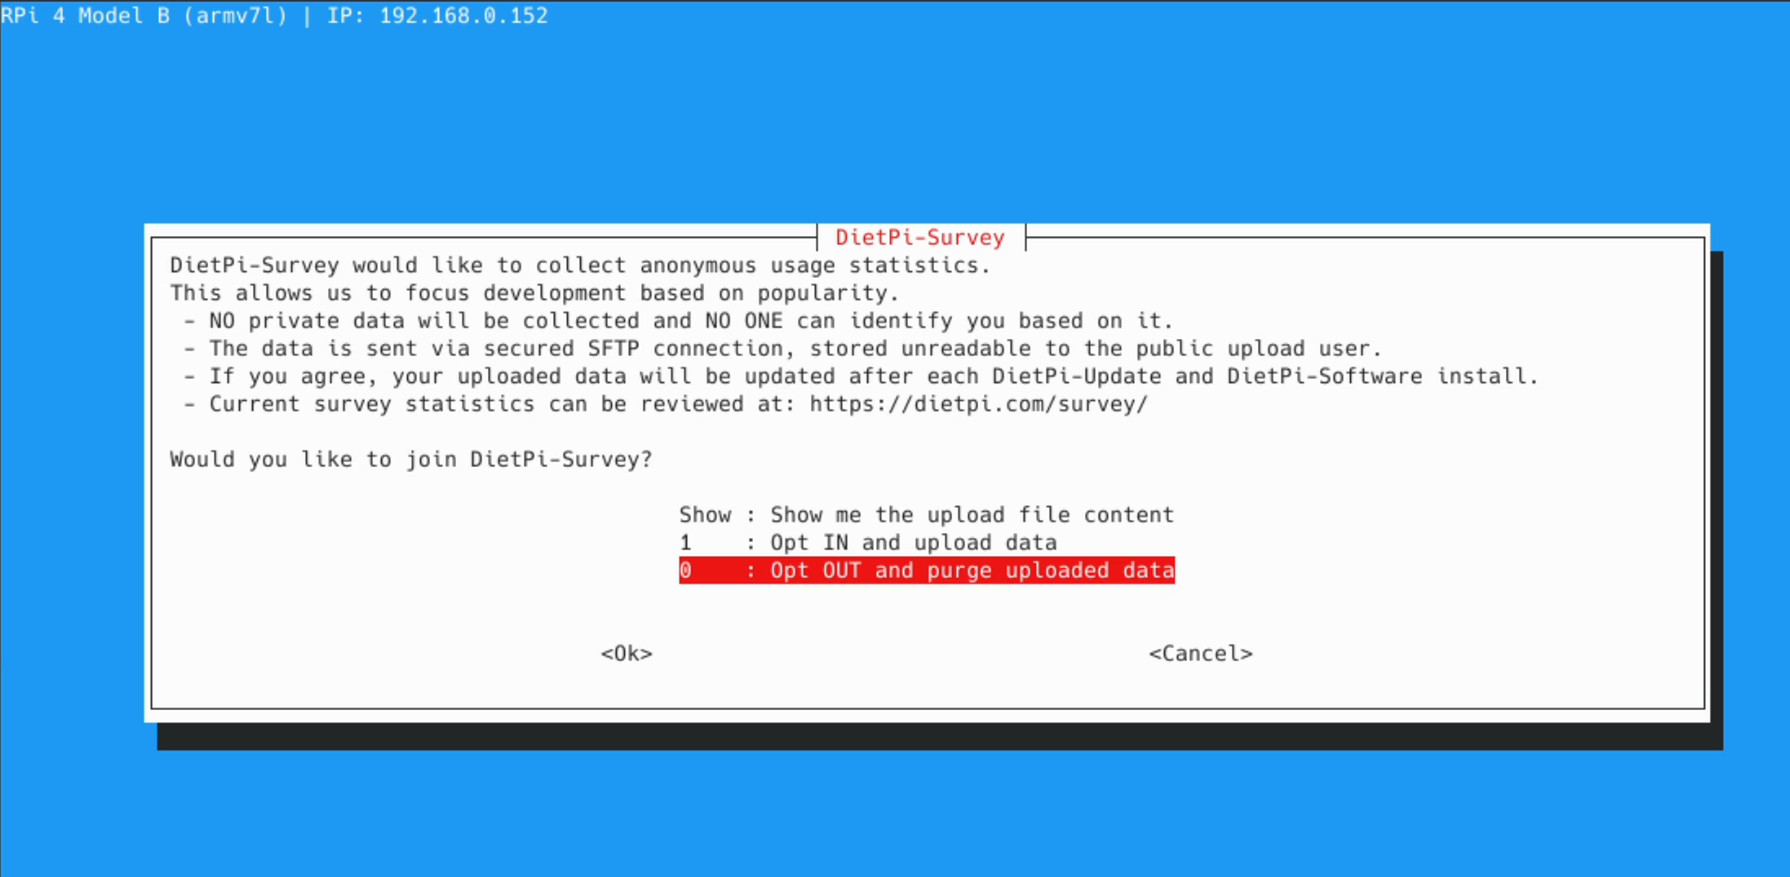
During the first boot, the system will update itself which might take a while depending on how fast your SD card is. When it’s done you’ll see the following screen. You’ll be asked if you want to opt in or out of the data and statistic collection, I’ll choose to opt out. Use the arrow keys to make your selection. Afterwards the system will automatically reboot. Wait a minute after it reboots before logging back in.
You’ll be asked if you want to change the default global password, select ok and choose your new password. Retype it to confirm. Then you’ll be asked if you want to change the default unix password, which you should also do. If security is super important then you might want to choose a different password than before, but I typically use the same password to make things easier. Next you’ll be asked if you want to disable the serial console. This is something typically used by developers for debugging purposes, so for most people you can select yes to disable this feature and free up a little more memory.
Configuration
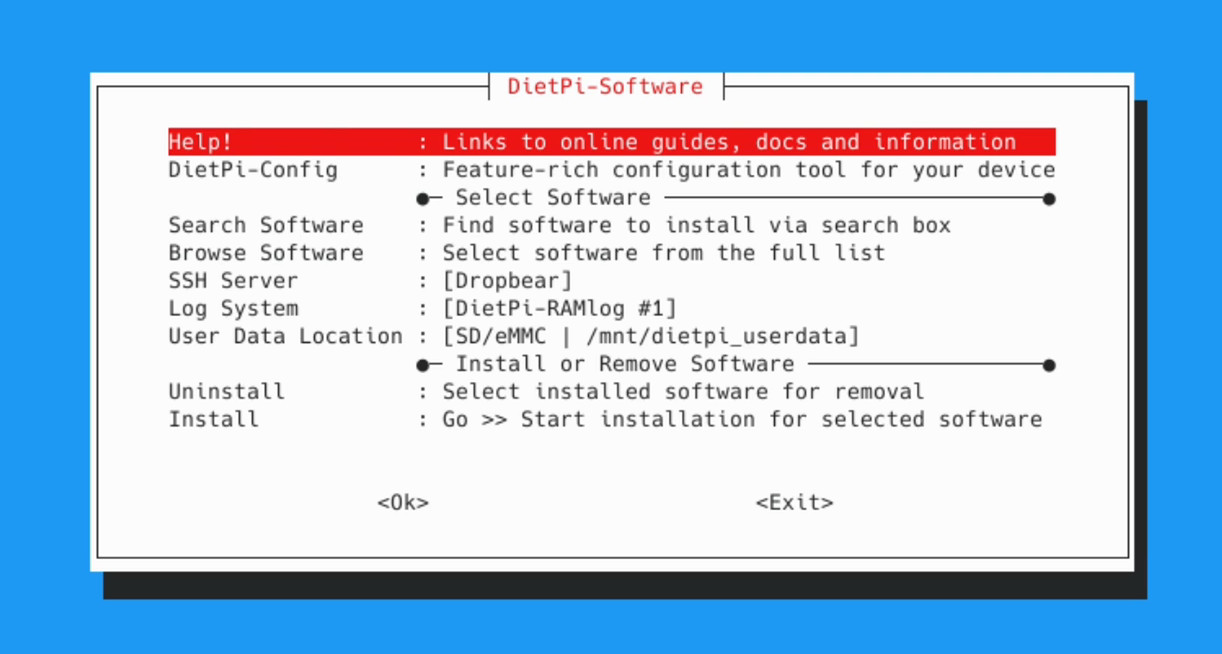
Next you’ll see the following screen where we can configure settings and install extra software. Keep in mind you can always return to this screen later if you want to make changes. Go to dietpi-config and then select display options. Then display resolution. If you have a monitor connected to the pi then you can change the output resolution here. Since I don’t plan to connect a monitor to it, I’ll select headless mode to reduce power consumpution.
Next go to GPU/RAM memory split. This is where you can allocate how much memory you want the GPU to use. This will depend on what you’re planning to do with the Pi. For most applications I typically go with the minimum amount which is 16 MB. If you plan to connect a monitor and install a desktop environment such as XFCE or Mate then you should choose at least 64 MB minimum, but personally I'd go with at least 128 MB. If you’re using the camera select at least 96 MB, but I recommend 256 MB if you plan to run full HD video.
Now if you’re planning to use the camera you’ll want to turn on both the RPi Codecs and RPi Camera. Also the RPi camera has a red LED on the front that turns on when its recording by default. If you want to keep it off then you set that here. Now go back and navigate to performance options. This is where you can overclock the Pi. I don’t recommend doing it unless you’ve installed a heatsink and/or a fan like I did. The Raspberry Pi 4 runs hotter than the previous generations, so I’m going to select ‘medium ARM’ rather than the highest OC setting for this one. If you select the highest option then you’ll want to run stress tests to make sure it’s stable.
Now navigate to the ‘Network Option: Adapters’ in the menu. This is where you can set up WiFi if your Pi supports it. Since I’ll be sticking with an ethernet cable, I’m going to turn off the onboard WiFi. Finally, take a look at the ‘Tools’ menu. This is where you can stress test the CPU to ensure your overclock is stable and also run benchmarks.
Software Packages
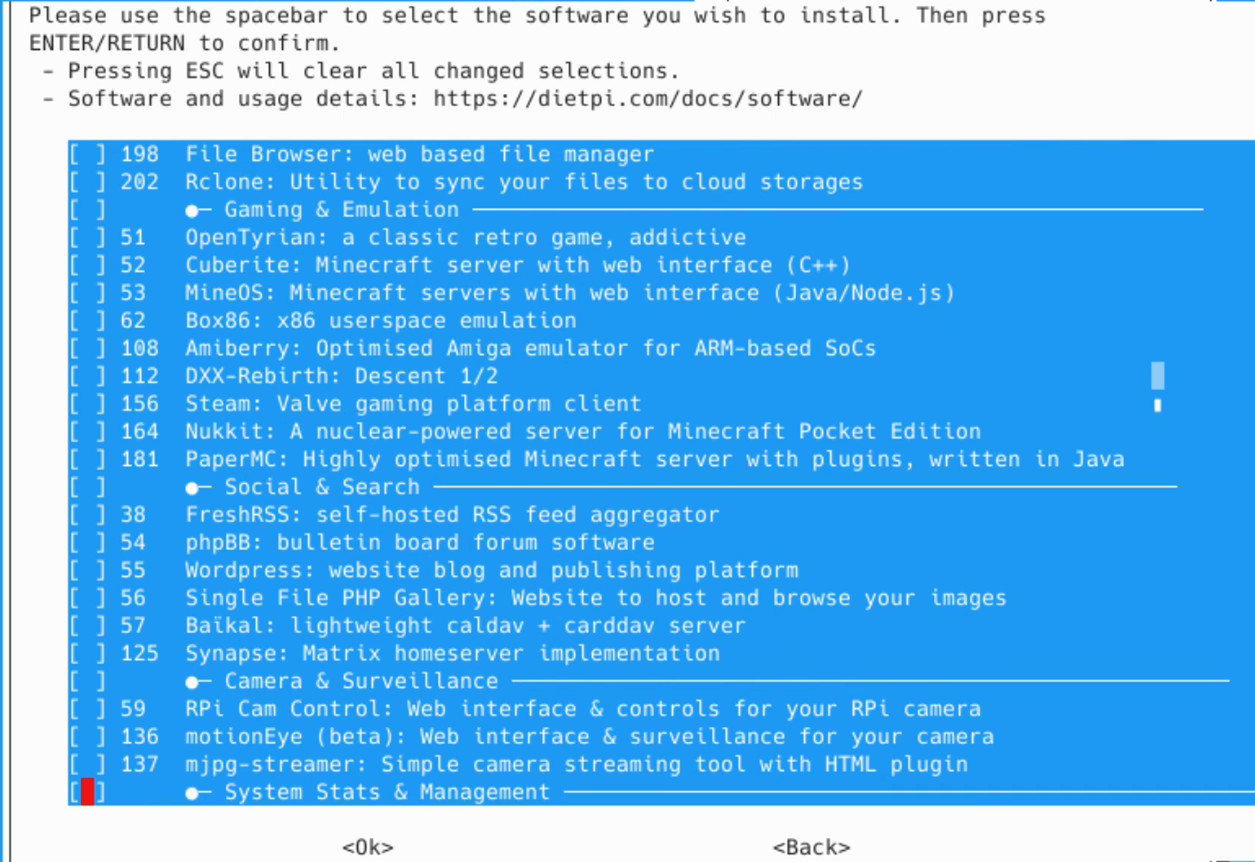
Okay now lets exit the config and take a look at some software that’s available. The two options are ‘Search Software’ and ‘Browse Software’. Let’s first take a look at browse. You’ll see an extremely long list of available packages to download, including desktop environments, media servers, video game emulators, and much more. Keep in mind you can install these packages later on using the command line like you would in any other Debian based distro, however this browse feature makes it extremely easy if you’re new to Linux. Simply hit spacebar on all the packages you want to download, then click ok. Alternatively, if you know the name of a specific package you want, you can use the ‘Software Software’ option instead. After you’ve selected the packages you want, go to ‘Install’ to complete the installation. This might take a while to complete.
Additional Info
Now that it’s done, we’re finally ready to use the Pi. Each time you login you’ll be presented with the following screen which gives some commonly used commands. For example, htop is where you can view the resource monitor. All the commands listed here need sudo to run, so type sudo htop to run it. To exit htop press Ctrl+C.
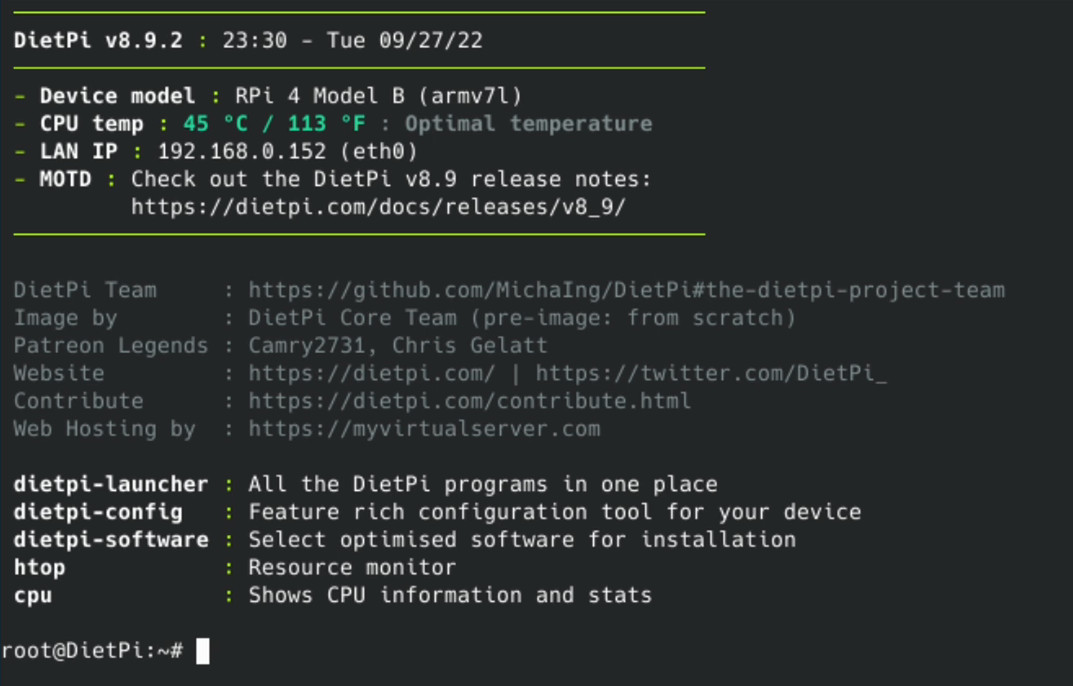
Typing sudo cpu will give you information about the CPU including the clock speed of each core. If you want to go back to the screen where we configured the settings and installed new software, type sudo dietpi-software to get there. And just like any other Linux distro, if you want to reboot simply type sudo reboot. And if you want to shutdown, type sudo shutdown -h now.
After the initial setup it's recommended to login using the dietpi user, not the root user. If you're logging in with SSH from a Linux system, you might need to remove the old SSH keys when logging in with a different user. If you get an error logging in with the dietpi user, try removing the old SSH key with this command ssh-keygen -R ip-address.
And finally, if you want to connect the Pi to a monitor and use it like a regular desktop PC, you'll need to install a desktop environment. Keep in mind running one of these uses a lot of system resources, so the RPi Zero and older models can be pretty slow. This is why I don't run a desktop on most of my Pis, but it's up to you whether you want to use it like a normal desktop PC or not. To install a desktop environment, enter sudo dietpi-software, go to "browse software", then install one of the packages listed under "Desktops". Xfce or Mate are good choices, but any of them will work and it's up to personal preference since they all have different aesthetics.
Conclusion
So that’s all for this tutorial. There’s endless possibilities with the Raspberry Pi thanks to the wide range of software packages available for it. If you have any questions or comments on this topic then be sure to check out the comments section in the YouTube video at the top of this page. Join me in the next part of this series where I show how to set up a live video stream using the Raspberry Pi’s camera or any USB camera. The stream can be viewed from any computer connected to your home network.
If you appreciate these ad-free guides & tutorials then consider making a donation here. Anything helps and it ensures the site remains clutter-free from 3rd party ads. Thank you!
Have a question or business inquiry? Get in touch!