Nvidia CUDA, PyTorch, Stable Diffusion & YOLO Installation Guide
Posted on May 30, 2023
Introduction
This guide will cover how to install Nvidia's CUDA which will allow you to run AI and machine learning models with hardware acceleration. Most of the guide will be done on a desktop running Kubuntu (Ubuntu 22.04), but afterwards I'll explain how to install on Arch based distros too. Everything will be installed locally on the system instead of using containers such as Docker. Some people may prefer going the container route instead, especially if you’re a developer who frequently works with different versions of packages, but for most people installing locally will be perfectly fine.
This guide will also cover how to install PyTorch which is a framework for machine learning tools in Python, and then I'll show how to install and run Stable Diffusion and YOLO object detection. These steps have been tested with both an RTX 3060 and a GTX 980 Ti. Nvidia has dropped support for GPUs older than Maxwell with the more recent releases of CUDA, but older cards still might work if you install an older version of CUDA. However this will require additional steps not covered here. Check Nvidia's documentation for CUDA version compatibility if you're using an older card.
Nvidia Drivers on Ubuntu
The first step is to install the Nvidia GPU drivers. When installing an Ubuntu based distro, you can select the option "Install third-party software for graphics..." and this will install the drivers for you. You can check if the drivers are already installed on your system by entering the following command in the terminal:
nvidia-smi

You should see information about your GPU. In the top right corner it will show the maximum supported version of CUDA that your drivers can support. If the drivers aren't installed yet, there are multiple methods to install them. Some distros such as Pop OS and Mint have a GUI interface if you prefer that method, or you can install the recommended version with the following commands:
sudo apt update

              sudo ubuntu-drivers devices

              sudo ubuntu-drivers autoinstall
Then restart your computer before continuing.
After verifying the drivers are installed, next install the Nvidia CUDA toolkit:
sudo apt update

              sudo apt install nvidia-cuda-toolkit
You might need to restart your computer before continuing, but in my case it wasn't necessary. Now verify the CUDA toolkit was installed successfully by running the following command and also take note of the version that it reports.
nvcc -V
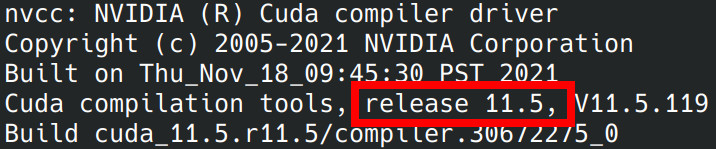
Installing CUDA with this method is the easiest way, but it won't give you the latest version. For most people this won't matter, but if there's a specific reason why you need the latest CUDA version, then you can follow this guide on Nvidia's site.
PyTorch
Next we can download PyTorch with either Conda or PIP. I'll be using PIP for this tutorial. If you don't have PIP installed on your system you can get it by entering:
sudo apt install git python3-pip python3-venv
Now we can install PyTorch, but it's best to create a Python virtual environment before installing packages with PIP. To create a default environment, enter:
python3 -m venv venv
Next you'll need to activate that environment. Each time you open a new terminal it will need to be re-activated, so make sure it's activated before installing packages with PIP or when running an application that requires Torch.
. venv/bin/activate
If you're running CachyOS or any system with the fish shell, use the following command instead:
. venv/bin/activate.fish
Now we'll install PyTorch. The recommended version can be installed with the following command:
pip3 install torch torchvision torchaudio
Now let's verify PyTorch was installed correctly with GPU support, so lets first enter the Python console.
python3
Now enter the following two lines of code. If it returns True then everything was installed correctly.
import torch

              torch.cuda.is_available()
Then enter exit() to exit the Python console.
YOLO Object Detection
Now we'll test it out with real applications, so let's first try it with YOLOv5. Make sure your Python venv is activated before running applications. Enter the following to download the repository and install the necessary packages with PIP:
git clone https://github.com/ultralytics/yolov5

              cd yolov5

              pip install -r requirements.txt
Now let's run it. First make sure you have a camera connected to the system.
python3 detect.py --weights yolov5s.pt --source 0
Press the q key to quit the application.
Stable Diffusion
Update: I now recommend using ComfyUI instead of WebUI because WebUI is outdated and still requires Python 3.10, and they don't seem to have any plans to update to newer versions. Here's the link for Stable Diffusion ComfyUI
I might do a video showing how to use ComfyUI, but the instructions are provided in the link above. Even though I no longer recommend WebUI, I've left the instructions here:
Now let's try out Stable Diffusion Web UI. First make sure you have the Python virtual environment package installed as well as a few other dependencies:
sudo apt install wget git python3-venv
Next download the repository and enter the directory.
git clone https://github.com/AUTOMATIC1111/stable-diffusion-webui

              cd stable-diffusion-webui
Now we can start the UI by entering the following command. The --xformers tag isn't necessary, but including it should improve performance slightly. Also you can ignore any warnings that mention TensorRT.
python3 launch.py --xformers
Now open your web browser and enter the address localhost:7860 to access the UI. Enter any keywords you'd like and then press generate. The default model is good, but you can find newer models to download at HuggingFace.co.
For Ubuntu 24.04 users you'll probably encounter an error because by default the WebUI script creates a Python virtual environment specifically for Python version 3.10, however the python3.10-venv package isn't available in Ubuntu 24.04. The workaround is to create a Python 3.10 virtual environment using either Conda or PyENV. Here are the instruction to install and setup PyENV.
Finally, if your venv works at first but then stops working later when using PIP, you might see an error message such as this "error: externally-managed-environment". This usually happens when your system updates to a newer Python version compared to what was used to create your venv. You can solve this by deleting the old venv folder and create a new one as shown above. You'll need to reinstall the PIP packages as well.
Installing Drivers on Arch Distros
The process for Arch based distros is extremely similar as above except for how the Nvidia drivers are installed. The packages in Arch are more up to date than the packages in Ubuntu, so this will ensure that you get the most up to date CUDA version. To install the drivers, all you need to do is install one of these packages depending on your preference (See here for more details).
sudo pacman -S nvidia
or if you prefer the open-source drivers:
sudo pacman -S nvidia-open
After installing the GPU drivers, you can then install CUDA with the following:
sudo pacman -S cuda
PyTorch can also be installed as a system package like this:
sudo pacman -S python-pytorch-cuda
The rest of the guide should be the same, except you'll need to download the mentioned software packages via pacman instead of apt.
If you appreciate these ad-free guides & tutorials then consider making a donation here. Anything helps and it ensures the site remains clutter-free from 3rd party ads. Thank you!
Have a question or business inquiry? Get in touch!